Kafka Clients and SSL – Qlik Replicate
While Apache Kafka can be a powerful tool for your enterprise data infrastructure, IT teams will work with many different APIs for ingesting real time data from diverse sources while trying not to degrade the performance of those source systems. Many organizations are finding that with Qlik Replicate (formerly Attunity Replicate) they can leverage Apache Kafka’s capabilities quickly and with less effort.
The purpose of this article will be to learn how to configure Qlik Replicate to work with your HDF Kafka Brokers over SSL. This guide assumes that you already have Kafka enabled for SSL. If not already done, see the link below for the apache Kafka documentation.
Prerequisite – Configuring Kafka for SSL
Identify your Kafka Brokers
In this example, we have a cluster with 3 brokers, all operating on the default port 6667
kafka01.mydomain.local:6667
kafka02.mydomain.local:6667
kafka03.mydomain.local:6667
Creation of the SSL files
Create the SSL key and CSR for your certificate
openssl req -newkey rsa:2048 -nodes -keyout qlik.key -out qlik.csr
In the case where you have more than one Qlik server, you should be following best practice and creating a Key, and CSR for each Qlik server you will be using. This may be tedious, but trust me, this will make your Security or CA team very happy.
At this stage, you will have your CA complete the signing process, and then provide the CA cert along with the signed certificate (the public key).
Files and Formats
At this point you should have the following files, in the corresponding formats
SSL private key – qlik.key (PEM)
SSL signed pubic key – qlik.crt (x509)
CA cert – CA.crt (x509)
Ensure that your files are in the formats listed, as this is crucial for having them work with Qlik.
What if I have more than one CA?
Some organizations use more than one CA, and Qlik only allows you to use one. To get around this, you can easily combine your CA certificates into one bundle. Let’s call these cert CA_Root.crt and CA_SSL.crt, simply concatenate them together.
cat CA_Root.crt CA_SSL.crt > CA_bundle.crt
Update the Kafka keystore and truststore
We can now add the entries for the Qlik client to Kafka’s keystore and truststore. We need import both the key and certitifcate here, because it is a two-way SSL connection.
Start by creating a p12 keystore for the Qlik key entry
openssl pkcs12 -export -in qlik.crt -inkey qlik.key -out qlik.p12 -name Qlik -CAfile CA_bundle.crt -caname CA_bundle
Import your p12 keystore into the Kafka keystore
keytool -importkeystore -destkeystore /etc/security/kafka/keystorekafka.jks -srckeystore qlik_prod.p12
Import your trusted certs into your Kafka truststore
keytool -import -file qlik.crt -alias qlik_cert -keystore /etc/security/kafka/kafka_truststore.jks
keytool -import -trustcacerts -file CA_SSL.crt -alias ca_root -keystore /etc/security/kafka/kafka_truststore.jks
keytool -import -trustcacerts -file CA_Root.crt -alias ca_ssl -keystore /etc/security/kafka/kafka_truststore.jks
Qlik config
Copy all of your files onto your Qlik machine(s), and adjust ownership for all files so that they can be seen by Qlik.
$ chown attunity:attunity qlik.crt
$ chmod 675 qlik.crt
note: If Docker is being used, all files used by the Qlik config must be in a directory visible by the Docker application, otherwise you will encounter vague errors when configuring the SSL files.
Open your Kafka connection from the Qlik UI and use the following settings for the config;
Type – Kafka
Broker servers –
kafka01.mydomain.local:6667,kafka02.mydomain.local:6667,kafka03.mydomain.local:6667
Security, Use SSL: CA path – “Insert Path to PROD_Kafka_SSL_CA.crt”
Authentication – Certificate
Public key file – “Insert Path to qlik.crt here”
Private key file – “Insert Path to qlik.key here”
Private key password – “Insert desired password here”
note: for the key password, if you have not configured one, you can get around this. Qlik does not accept no password, so you can just input anything for this field and the connection will still work.
Connection tests
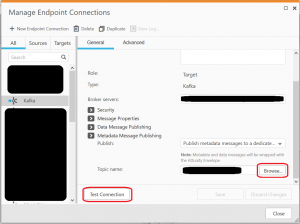
You can test the connection with the Qlik Managing Endpoint tool:
If typos are found in the certificate, Attunity will give an error message similar to this:
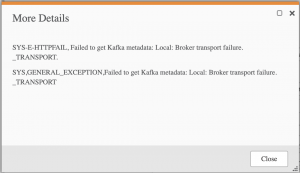
This error will occur if the connection test is unsuccessful between Attunity and Kafka :
In our experience the fix has been;
1) Certificate used for the connection has expired. Renew it, or create a new one for your CA to sign
2) The Kafka keystore or truststore is missing the Private Key or Public Key (signed cert) entry. Verify your entries.
In this case, the CA file could not be read due to typos. Test it using openssl to ensure it is correct :
Testing an SSL cert
openssl x509 certificate.crt -text
note: This will display all certificate info if there are no typos in your file. You can also see “Validity” info as well, to verify when your certificate will expire.
If you found this article helpful, you can check out our other blog posts here.
Happy Hadooping!
Written by Ryan St. Louis
© 2019 Fullview Design. All rights reserved. Privacy Policy.